Monday, 21 December 2015

esp8266

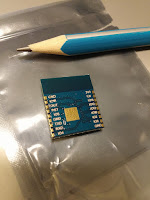
Based on the nice instruction, now I have to try ITO with the little module esp8266.


  • In this this experiment I follow the esp8266 repository. As the preparation below, 
  • Install Arduino 1.6.5 or higher from the Arduino website. 
  • Start Arduino and open Preferences window. 
  • Enter http://arduino.esp8266.com/stable/package_esp8266com_index.json into Additional Board Manager URLs field. 
  • You can add multiple URLs, separating them with commas. 
  • Open Boards Manager from Tools > Board menu and install esp8266 platform (and don't forget to select your ESP8266 board from Tools > Board menu after installation). 


สำหรับบทความภาษาไทยที่เขียนไว้ดีมาสามารถดูได้ที่ บทความ

รายละเอียดอื่นเกี่ยวกับคุณสมบัติ esp8266 สามารถหาได้จาก docs


An example code to connect to a network using DHCP.

-------------------------------------------------------------------------------
#include <ESP8266WiFi.h>
const char* ssid     = "networkID";//enter your network ssid
const char* password = "password"; //password of the network
void setup(){
    Serial.begin(115200);   //an esp8266 uses 115200 bit rate by default 
    delay(100);             //some small delay the get the serial connection ready 
    
    //attempting to connect the network and aquiring IP from a DHCP server
    Serial.print("Connecting to netwok");
    Serial.println(ssid);
    WiFi.begin(ssid, password);
    
    //waiting for connection
    while (WiFi.status() != WL_CONNECTED){
            delay(500);
            Serial.print(".");
    }
    //show connection details
    Serial.println("Connected IP address: ");   
    Serial.println(WiFi.localIP());
}
void loop() {}
----------------------------------------------------------------------------------


Thursday, 29 October 2015

LMC filling memory
-------------------
        lda x
f1     add one
        sta 3
x      dat 305
        bra f1
one  dat 1
--------------------
f1     lda x
        add one
        sta f1
        bra f1
one  dat 1
x      dat 305
--------------------

Monday, 14 September 2015

regular expression

https://support.google.com/docs/answer/3378864?hl=en
http://www.w3schools.com/jsref/jsref_obj_regexp.asp

Tuesday, 25 August 2015

Enabling OMP on PC


In cs426, we use OpenMP both on PC and in SciCloud. If you want to try OpenMP on you laptop or PC, you may have to install some software as following.
  1. get CodeBlock IDE and MinGW
  2. include C:\MinGW\bin to system path
  3. install mingw32-pthreads-w32 using C:\MinGW\bin\mingw-get.exe
  4. In codeBlock, Settings>>compiler>>linker setting>>link library=C:\MinGW\bin\libgomp-1.dll
  5. In codeBlock, Settings>>compiler>>compiler settings>>other options= -fopenmp
You may need to restart your computer to apply the new configuration.

Wednesday, 19 August 2015

creating a new network in SciCloud

To create a new network:

  1. networks>create network>subnet=192.168.0.0/24
  2. create routers>select external network to attach the routers>create an interface to the new network
  3. Now a new instance can be attached to the new network. However, it could not resolve the URL, a DNS servers in /etc/resolv.conf need to be change. Add "nameserver 8.8.8.8" to the /etc/resolv.conf 

Tuesday, 7 July 2015

Analog reader

An one day project to create an analog reader for some scientific instruments. Objective of the project is to make an interface between any analog sensors to a computer. Her we choose the following ingredients;

-Arduino Uno to read analog signals and send messages to a computer through a serial port
-pyserial to get the serial input to python environment
-matplotlib
-Bokeh to visualise the analog signal in real-time


What we have done!
1. Make sure the Arduino IDE and driver are already installed
2. Python2.7 and pyserial must be installed. Here we use Anaconda and pyserial need to be installed by "$conda install pyserial" on Windows and "pip install pyserial" on Unix.
3. Install Bokeh
4. Then we made a simple implementation for communication between Uno and PC by using the codes here.

Tuesday, 28 April 2015

cluster cheat sheet

Copy files between machines:
>>pscp localfile user@host:path

Get twitter keys
Go to https://apps.twitter.com/

Install MySQLdb
>>conda install mysql-python

User
check user detail
>>sudo cat /etc/passwd
delete user home directory
>>sudo userdel -r [username]
ec2 passwd enabled-- http://www.cyberciti.biz/faq/howto-linux-add-user-to-group/
Storage usage
>>sudo du -sh /home/
or
>>sudo df -h

Screen sharing
>>screen -S sessionName
>>screen -x

Starcluster
Error: Too many open files (sinaler.cpp:300)-- https://flenniken.net/blog/65/

Thursday, 12 February 2015

Qt creator msvc2013 + video player

I spent hours to make qml video sample run on Window 8. This should be noted for others who want to use Qt Creator on Windows (with Ubuntu is a lot easier).

The video sample needs OpenGL. However gl.h for pre-built qt-libraries msvc2013 require external OpenGL from Window SDK . Actually it is quite straightforward, if I could find the SDK directly. I wouldn't spent hours on this issue. The problem was on Qt web page they didn't point to the download link then I went to this page and install almost everything in the page until I found the right installer. So, if you have the similar problem and get an error message like below then you just install the Window SDK. All the best!

error: C1083: Cannot open include file: 'GL/gl.h': No such file or directory

Tuesday, 3 February 2015

ipcluster setup

setup ipcluster

1. install IPython please check here
2. it is better to make a snapshot at this point
3. create a IPython.parallel profile
      >>ipython profile create --parallel -profile=[profile_name]
4. find profile/ipcontroller_config.py and edit
            c = get_config()
      c.HubFactory.ip='*'
5. start a controller with --ip=[contoller_ip]
***if do the 5th step, the  3rd and 4th is unneesary

           ipcontroller --ip=10.0.1.74
    or
           ipcontroller start --ip=10.0.1.74


6. copy ipcontroller-engine.json from controller (10.0.1.74) to all engines (10.0.1.90 and the rest) by executing a script

            scp /home/ubuntu/.config/ipython/profile_default/security/ipcontroller-engine.json ubuntu@10.0.1.90:/home/ubuntu/.config/ipython/profile_default/security/

7. start engine by
            ipcluster engines
    or
            ipcluster engines --n=8


Tuesday, 13 January 2015

setup Hadoop

In cs426 we're going to use Hadoop platform and the setup instructions are following:
CDH5 and  Hortonworks


Useful hdfs commands here