Create PayPal payment button
https://www.paypal.com/us/cgi-bin/webscr?cmd=_button-designer
Thursday, 11 August 2016

Monday, 13 June 2016
Thursday, 10 March 2016
ตัวอย่างวิดีโอแนะนำสินค้า
ทำโปรเจคไปทำไม? (ถ้าขายไม่ได้) การทำวิดีโอแนะนำสินค้าเป็นส่วนสำคัญที่ทำให้สาธารณชนสามารถเข้าใจสินค้าได้โดยใช้เวลาเพียงไม่กี่นาที เราลองมาดูลักษณะวิดีโอโฆษณาสินค้าที่ดีกันว่ามีคุณลักษณะอะไรบ้าง
การทำวิดีโอแนะนำสินค้าควรมีลักษณะดังนี้
- ใช้เวลาไม่เกิน 3 นาที
- ในการอธิบายขั้นตอนการใช้งานควรใช้ภาพกราฟฟิกง่ายๆ (ง่ายพอที่จะทำให้น้องๆเด็กประถมเข้าใจ)
- ไม่ควรใช้สีเยอะ (3 สีกำลังสวย)
- ใช้ ลวดลาย สีและภาพเคลือนไหว ในจุดที่ต้องการเน้น
- ชื่อสินค้า (ย้ำหลายๆครั้ง ใส่โลโก้ถ้ามี)
- ทำไมผู้ชมต้องสนใจสินค้านี้ (ปัญหาขอผู้ชมที่เราสามารถช่วยได้)
- ขั้นตอนการใช้งาน และผลลัพธ์
- ประโยคปิด สรุปทั้งวิดีโอ อย่าลืมชื่อสินค้า
ตัวอย่างวิดีโอที่หน้าสนใจ
groupon: https://vimeo.com/12825301
cottonique: https://vimeo.com/14732421
Wednesday, 9 March 2016
การใช้คำสั่ง subst [windows]
ผมทดลองโค๊ดสั้นๆเพื่อเก็บไว้ใช้ในงานครั้งต่อไป โดยต่อนี้ผมเก็บโค๊ดเหล่านี้ไว้ใน github และ google drive ซึ่งการเข้าถึง directory เหล่านี้ยาวเกินไป เปลื้องพื้นที่ในสมองในการจำตำแหน่งไฟล์เหล่านี้ เราน่าจะตั้งชื่อ path เหล่านี้ใหม่ให้สั้นลง (คล้ายๆกับคำสั้ง alias ที่ย่อคำสั่งยาวๆให้สั้นลง)
นี้กรณีนี้ผมต้องการสร้าง drive ใหม่ที่ชี้ไปที่ directory ที่ผมทดลองโค๊ด เพื่อจะเข้าถึงได้สะดวก โดยผมจะทำการ mapping ระหว่าง C:\Users\Wasit\Google Drive\_tutorials ให้มีชื่อใหม่ว่า T: โดยใช้คำสั่ง
>> subst t: "C:\Users\Wasit\Google Drive\_tutorials"
นี้กรณีนี้ผมต้องการสร้าง drive ใหม่ที่ชี้ไปที่ directory ที่ผมทดลองโค๊ด เพื่อจะเข้าถึงได้สะดวก โดยผมจะทำการ mapping ระหว่าง C:\Users\Wasit\Google Drive\_tutorials ให้มีชื่อใหม่ว่า T: โดยใช้คำสั่ง
>> subst t: "C:\Users\Wasit\Google Drive\_tutorials"
 |
| คำสั่งที่ใช้ในการทำ mapping |
 |
| drive T: ถูกสร้างขึ้นใหม่ |
 |
| สามารถลบ T: ได้โดยใช้ "subst t: /D" |
Tuesday, 1 March 2016
Google SQL pricing
Here a database pricing minimum cost is $0.36 per day.
https://cloud.google.com/sql/pricing#v1-pricing
https://cloud.google.com/sql/pricing#v1-pricing
Monday, 21 December 2015
esp8266
Based on the nice instruction, now I have to try ITO with the little module esp8266.
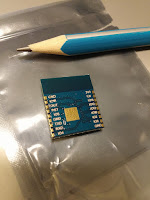

- In this this experiment I follow the esp8266 repository. As the preparation below,
- Install Arduino 1.6.5 or higher from the Arduino website.
- Start Arduino and open Preferences window.
- Enter http://arduino.esp8266.com/stable/package_esp8266com_index.json into Additional Board Manager URLs field.
- You can add multiple URLs, separating them with commas.
- Open Boards Manager from Tools > Board menu and install esp8266 platform (and don't forget to select your ESP8266 board from Tools > Board menu after installation).

รายละเอียดอื่นเกี่ยวกับคุณสมบัติ esp8266 สามารถหาได้จาก docs
An example code to connect to a network using DHCP.
-------------------------------------------------------------------------------
#include <ESP8266WiFi.h>
const char* ssid = "networkID";//enter your network ssid
const char* password = "password"; //password of the network
void setup(){
Serial.begin(115200); //an esp8266 uses 115200 bit rate by default
delay(100); //some small delay the get the serial connection ready
//attempting to connect the network and aquiring IP from a DHCP server
Serial.print("Connecting to netwok");
Serial.println(ssid);
WiFi.begin(ssid, password);
//waiting for connection
while (WiFi.status() != WL_CONNECTED){
delay(500);
Serial.print(".");
}
//show connection details
Serial.println("Connected IP address: ");
Serial.println(WiFi.localIP());
}
void loop() {}
----------------------------------------------------------------------------------
Subscribe to:
Posts (Atom)